From OpenHome
Contents |
Introduction
This document is for developers using the OpenHome SDK to integrate a Widget into an OpenHome system. Each Widget must have its own driver to allow it to communicate with the OpenHome Nodes.
To help you write your driver, this document provides high level descriptions of the core responsibilities of a Widget driver and gives a detailed walk-through using example code.
Full versions of each file used in the development of the example driver are available in the Appendix.
Prerequisites
To begin development of your Widget driver you must be in possession of the following items:
- your Widget Service XML that describes the properties on your Widget.
Note
This document does not contain advice on how to write Widget Service XML. Refer to the OpenHome Widget Service XML definition document for more details.
- the OpenHome SDK
- your chosen communication protocol's API
The protocol you choose for your Widgets must be the same protocol used on your choice of Node.
Note
This document focuses on the development of the Widget driver. Details about the communications protocol used are beyond the scope of this document. This document assumes you are familiar with your chosen protocol's code libraries and are able to use them in the driver code you write.
Related Documents
The following related OpenHome documentation may be of interest to you:
- ohWidget Technical Overview
- OpenHome Widget Service XML definition
- OpenHome ohNet Device Stack
- OpenHome Node Architecture
Note
None of the related documents listed above is mandatory reading for Widget driver development.
Widget Service XML
Widget Service XML
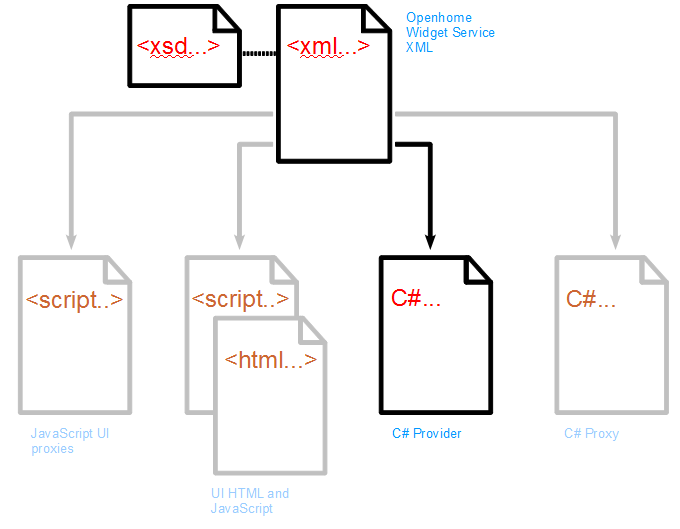
OpenHome Widget driver writing relies heavily on the use of code generated from a single source — the Widget Service XML.
The service and actions your Widget provides are represented in code in a file called a Provider. The Provider is automatically generated from the Widget Service XML and produces an abstract class for you to inherit when you write your concrete class driver.
To aid in the explanation of how the Provider is created and put to use we will follow the development of a driver for a simple light Widget; taking the defined Widget Service XML and stepping through how it is used to generate the other files. Examples of code are used throughout this document to show you how each one is created and used in an OpenHome system.
It is essential that you start with a well-formed Widget Service XML, conforming to the schema defined in the WidgetService.xsd. The following diagram shows the significance of the Widget Service XML in relation to the generated files you will use when writing your driver:
Note
- The grayed-out files are not relevant to Widget driver development but can also be generated from the Widget Service XML.
- The Provider is generated in C#, meaning your driver must be written in C# as well. The use of managed code is mandatory for driver writing in the OpenHome framework.
Code sample used in this document
Our examples in this document use a Widget Service XML definition for a light Widget called BasicLight.xml.
Note
Full versions of all the example files used in this document are available in the Appendix.
We will see how the Provider is generated from this XML and how it is used to aid the driver writing process. The examples also show how your chosen communication protocol should be used in the body of the driver code.
Implementation details of specific protocols you choose to use are beyond the scope of this document. However, the samples used in this document show the use of the SimpleUPnP protocol to aid you in your development process.
The SimpleUPnP protocol was developed as a test protocol during the early stages of the OpenHome project. It is included in the OpenHome SDK and can be used as a public resource.
The use of SimpleUPnP in the example files and the code snippets within the following sections is highlighted by the !! icon. The lines of code marked by !! must be changed to code from your chosen communication protocol's library. SimpleUPnP is left in to help you understand how a protocol is used in a working example.
The sample code provided attempts to show best-practice coding standards. There are several sections of code that have a mandatory layout or that call specifically named methods and functions. These areas of the code are highlighted where required.
Where the examples do not explicitly state that the code shown is mandatory, you are free to implement it in a different way according to your own coding style and practices.

