From OpenHome
Introduction
This document is for developers using the OpenHome SDK to integrate a Widget into an OpenHome system. Each Widget must have its own driver to allow it to communicate with the OpenHome Nodes.
To help you write your driver, this document provides high level descriptions of the core responsibilities of a Widget driver and gives a detailed walk-through using example code.
Full versions of each file used in the development of the example driver are available in the Appendix.
Prerequisites
To begin development of your Widget driver you must be in possession of the following items:
- your Widget Service XML that describes the properties on your Widget.
Note
This document does not contain advice on how to write Widget Service XML. Refer to the OpenHome Widget Service XML definition document for more details.
- the OpenHome SDK
- your chosen communication protocol's API
The protocol you choose for your Widgets must be the same protocol used on your choice of Node.
Note
This document focuses on the development of the Widget driver. Details about the communications protocol used are beyond the scope of this document. This document assumes you are familiar with your chosen protocol's code libraries and are able to use them in the driver code you write.
Related Documents
The following related OpenHome documentation may be of interest to you:
- ohWidget Technical Overview
- OpenHome Widget Service XML definition
- OpenHome ohNet Device Stack
- OpenHome Node Architecture
Note
None of the related documents listed above is mandatory reading for Widget driver development.
Widget Service XML
Widget Service XML
OpenHome Widget driver writing relies heavily on the use of code generated from a single source — the Widget Service XML.
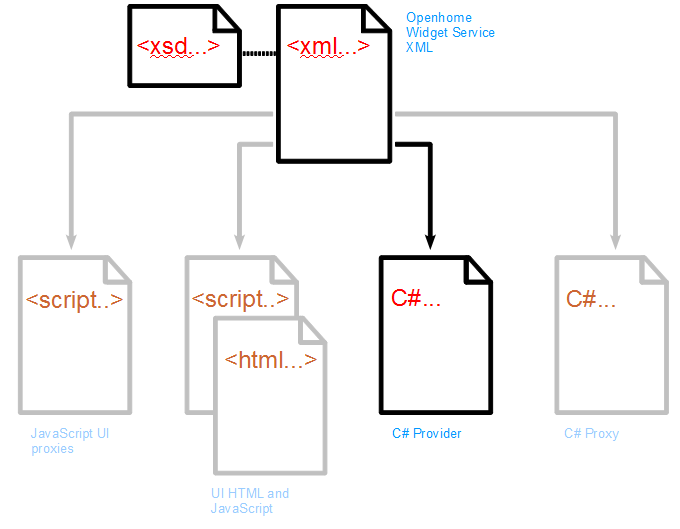
The service and actions your Widget provides are represented in code in a file called a Provider. The Provider is automatically generated from the Widget Service XML and produces an abstract class for you to inherit when you write your concrete class driver.
To aid in the explanation of how the Provider is created and put to use we will follow the development of a driver for a simple light Widget; taking the defined Widget Service XML and stepping through how it is used to generate the other files. Examples of code are used throughout this document to show you how each one is created and used in an OpenHome system.
It is essential that you start with a well-formed Widget Service XML, conforming to the schema defined in the WidgetService.xsd. The following diagram shows the significance of the Widget Service XML in relation to the generated files you will use when writing your driver:
Note
- The grayed-out files are not relevant to Widget driver development but can also be generated from the Widget Service XML.
- The Provider is generated in C#, meaning your driver must be written in C# as well. The use of managed code is mandatory for driver writing in the OpenHome framework.
Code sample used in this document
Our examples in this document use a Widget Service XML definition for a light Widget called BasicLight.xml.
Note
Full versions of all the example files used in this document are available in the Appendix.
We will see how the Provider is generated from this XML and how it is used to aid the driver writing process. The examples also show how your chosen communication protocol should be used in the body of the driver code.
Implementation details of specific protocols you choose to use are beyond the scope of this document. However, the samples used in this document show the use of the SimpleUPnP protocol to aid you in your development process.
The SimpleUPnP protocol was developed as a test protocol during the early stages of the OpenHome project. It is included in the OpenHome SDK and can be used as a public resource.
The use of SimpleUPnP in the example files and the code snippets within the following sections is highlighted by the ![]() icon. The lines of code marked by
icon. The lines of code marked by ![]() must be changed to code from your chosen communication protocol's library. SimpleUPnP is left in to help you understand how a protocol is used in a working example.
must be changed to code from your chosen communication protocol's library. SimpleUPnP is left in to help you understand how a protocol is used in a working example.
The sample code provided attempts to show best-practice coding standards. There are several sections of code that have a mandatory layout or that call specifically named methods and functions. These areas of the code are highlighted where required.
Where the examples do not explicitly state that the code shown is mandatory, you are free to implement it in a different way according to your own coding style and practices.
Driver responsibilities
Driver responsibilities
An OpenHome Widget driver has several responsibilities which must be met before it can be used on an OpenHome Node.
These responsibilities are listed R1 to R7 and are defined here, explaining what each one must do.
R1 Specifying the type of Widget the driver controls
A driver must know which type of Widget it can communicate with and be able to provide that information to the Discovery Module. A driver will normally communicate with one specific type of Widget and will only ever use one communications protocol.
R2 Reacting to a discovered Widget on the network
A driver must create a new IWidgetRegistryEntry object to represent the Widget and use it to listen to changes in the physical Widget's state.
R3 Setting the initial values for the Widget's properties
A driver must set the Widget object's initial properties.
R4 Publishing discovered Widgets in the Local Widget Registry on the Node
Publishing Widgets advertises their presence on the network. This allows Nodes to access the Widgets and present their services for use. A driver must be able to enable and publish a Widget object.
R5 Reacting to an event reported from the Widget
A driver must update the Node with the state of the Widget's properties when the Widget reports a change.
R6 Reacting to actions sent to the Widget
A driver must update a specified property to a new value when instructed to do so by the Node.
R7 Reacting to a Widget's departure
A driver must properly handle the IWidgetRegistryEntry object when the physical Widget is no longer available.
The sections of example code that follow show you how to write a driver from beginning to end. The accompanying text explaining the example code highlights when a responsibility, or part of a responsibility, has been met.
Driver Architecture
Driver Architecture
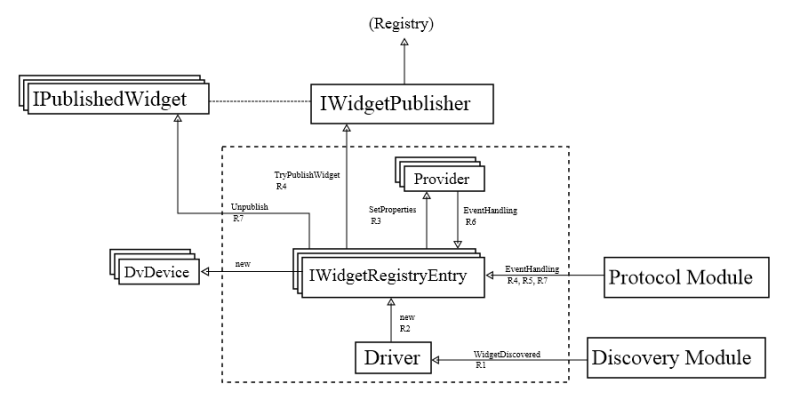
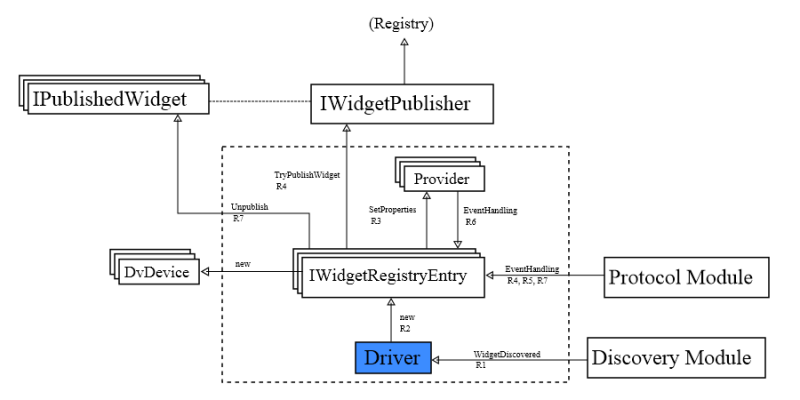
Drivers are installed on the Node and used when the Node needs to communicate with the Widget. Drivers use several objects to communicate with Widgets over the Widget's lifetime. Figure 2 shows the objects used by the driver and how the responsibilities listed above relate to each one:
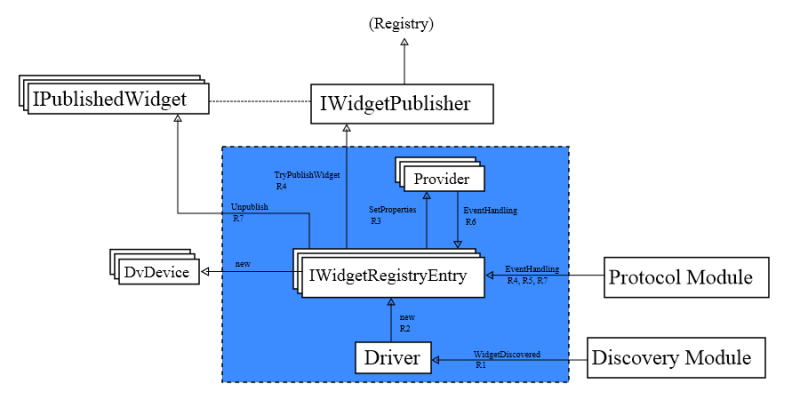
The objects contained in the dotted boundary must appear in the code you write to define your driver. The Driver, Provider and IWidgetRegistryEntry objects are all contained in the same driver file. We begin discussing this on page 12.
The other objects are provided by the OpenHome SDK or as installed components on the Node.
The Discovery Module informs the driver of the presence of an available Widget.
Each Node has a Protocol Module which contains the protocol's API. Widgets can communicate with OpenHome Nodes using any one of the set of communications protocols the Node supports. The driver uses your chosen protocol's Protocol Module to communicate with the Widget.
Both the Protocol Module and the Discovery Module are installed on the Node. When you write your driver you will use your Protocol Module to allow the driver to communicate with the Widget.
IWidgetPublisher, IPublishedWidget and DvDevice are objects provided in the OpenHome API. You can read about them in the APIs.
Generating the Provider
Generating the Provider
You must generate your provider before you can begin writing your Widget driver. You use your provider as a guide to implement the functions your Widget needs to set the values of its properties.
The current provider generation process is a manual one involving the use of a text transform tool.
Speak to your OpenHome contact who will help you generate your provider.
Future releases of the OpenHome SDK will include a tool to help you generate the provider.
Prerequisites
You must be in possession of:
- the OpenHome SDK, unpacked on your computer
- your Widget Service XML file
Writing a SimpleUPnP driver
Introduction to the SimpleUPnP protocol
The SimpleUPnP protocol was developed as a test protocol used to control emulated Widgets over a custom UPnP service.
This chapter shows how a driver is written using the SimpleUPnP communications protocol. The aim is to show the code using as generic a protocol as possible so that you can see where your own protocol specific code needs to go.
The use of code specific to the SimpleUPnP implementation is highlighted by the use of the ![]() icon. The lines of code are marked by this icon to make it easier for you to see where the protocol-specific code must go and what parts of the code are generic.
icon. The lines of code are marked by this icon to make it easier for you to see where the protocol-specific code must go and what parts of the code are generic.
Register model
SimpleUPnP is modeled on 8 physical registers available on the Widget. Each register is 32-bits wide. They are indexed from 0 to 7 and the last register (register 7) is reserved for storing the Widget's class.
This detail is used by the Protocol Module on the Node to determine which driver is needed to run the new Widget when it has been discovered.
The remaining 7 registers (registers 0 to 6) are free for Widget engineers to assign to the Widget's functions.
Registers 0, 1, 2 and 3 are available as read/write registers. Registers 4, 5 and 6 are readonly registers.
Only the emulated hardware (running on the Node) can change the values held in registers 4, 5 and 6.
Register use in drivers
In the example that follows we have a Basic Light Widget with a very simple function: it can be turned on and turned off. The on/off value is stored in register 0, with values 0=OFF and 1=ON. Register 0 is a read/write register. This means we can change the value stored there using messages passed to the Widget from the Node, and by reacting to physical interactions at the Widget (such as someone manually switching the light on or off).
The mapping of registers to properties on the Widget is decided by the engineers who manufacture the device. You must be provided with the mapping before you begin developing your driver.
Starting the driver
When you have generated the abstract provider you can put it to use in the Widget driver. A Widget driver has three distinct components:
- an implementation of your abstract provider
- a definition of the Widget driver
- an implementation of the IWidgetRegistryEntry interface
Important
You must manually write the code for your Widget driver. The differences in implementation of Widget properties and communication protocols means that the driver code cannot be autogenerated.
This section takes you through how to write a Widget driver by implementing the auto-generated provider, starting from a new blank file and finishing with a working driver for the Basic Light Widget.
Note
No assumptions have been made about the type of editor you use to write your code. Shortcuts or macros that you use as standard will not appear in the instructions below. A full example BinaryLightDriver.cs is available to review in Appendix C.
Writing the code
Create a new C# file in your IDE. Ensure the following libraries are used:
using System; using System.Collections.Generic; using OpenHome.Net.Device; using OpenHome.Widget.Nodes.Local; using OpenHome.Widget.Nodes.Local.Providers;using OpenHome.Widget.Protocols.SimpleUpnp; namespace OpenHome.Widget.Drivers.SimpleUpnp {
Important
You must use the libraries listed above for this specific example.
In general, drivers require the following libraries:
- System*
- System.Collections.Generic*
- OpenHome.Widget.Nodes.Local.Providers
Your driver will fail to compile if you miss any of these listed libraries. Libraries marked * are typically added by default by most modern IDEs.
The OpenHome.Widget.Protocols.SimpleUpnp library is required only in this SimpleUPnP example. Drivers using a different protocol will use their own protocol library.
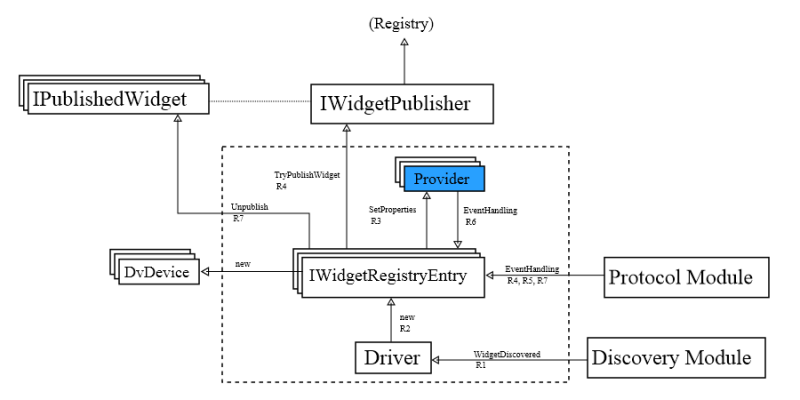
Implementing the provider
You use your auto-generated abstract provider by writing an implementation of it in the driver file. Responsibilities met by implementing your auto-generated provider are:
R3 Setting the initial values for the Widget's properties
A driver must set the Widget object's initial properties.
R6 Reacting to actions sent to the Widget
A driver must update a specified property to a new value when instructed to do so by the Node.
Writing the code
Begin by creating a new class. It will subclass the abstract auto-generated provider:
class BinaryLightProvider : DvProviderOpenhomeOrgTestBinaryLight1
{
The Protocol Module will provide an API for the Provider to use to communicate with the Widget. In SimpleUPnP we are provided with an interface called ISimpleUpnpWidget. The provider is supplied with the required instance of the interface by the Discovery Module on the Node.
The mechanisms for registering providers with specific Protocol Modules, and for the way the module gives each provider its required interface are covered later when writing the discovery method.
For now, we need to give the Provider a place to store the interface that it will later use to communicate with the Widget:
private ISimpleUpnpWidget iProtocol;
The interface from the Protocol Module is passed in as a parameter in the Provider's constructor and then assigned to the variable we just created:
public BinaryLightProvider(DvDevice aDevice,ISimpleUpnpWidget aProtocol) : base(aDevice) { iProtocol = aProtocol; }
Note
To satisfy R3 we would normally set the Widget's properties here, giving them an initial value. However, in this specific example we cannot set the value of Basic Light's only property because we will never know, in advance, what the state of the light will be (either on or off) when we create the DiscoveredWidget.
When you cannot set the properties ahead of time, and you are using an eventing protocol like SimpleUPnP, you can instead set them in the HandleRegisterEvent method in the driver class. This also satisfies the requirements for R3. You must set the Widget's properties before you enable it using SetEnabled().
The abstract provider includes an abstract method called SetOn. This method is invoked by the Node when passing a message to the Widget, specifically to set the on property of the Widget to either 0 or 1. The implementation of this method will meet the requirements for R6.
We must override this method and provide the protocol module a way of passing a message on to the Widget to perform the required action, in this case turn the light on or off:
         protected override void SetOn(uint aVersion, bool aValue)
         {
            iProtocol.Registers[0] = aValue ? (uint)1 : 0;
         }
    }
In this example the Basic Light's SetOn property (the boolean property that controls whether the light is on or off) is represented in the physical Widget by the register that has an index of 0.
Note
- This method is an example of an action on a Widget. Actions are messages sent from the Node to the Widget. We will see later how to handle events that need to be passed back from the Widget
to the Node.
- Your own Widget will likely provide more than a single property. Your auto-generated provider will contain one abstract method to represent each writable property. Read-only properties are not provided an abstract method.
You must implement each abstract method in your driver to ensure the relevant property on the Widget can be set.
We have now finished implementing the provider. The next step is to implement the driver.
Implementing the driver
The code for your Widget driver must provide an implementation of the IWidgetRegistryInterface, including the following tasks:
- methods to expose identifying details about the Widget for the Node to access
- providing methods to handle events reported by the Widget

